Christmas Dates

Date Pinwheels
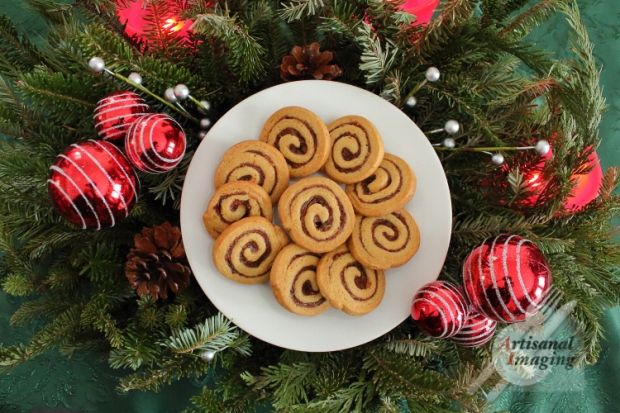
Perhaps there’s a little spin on my reporting that the best tasting Christmas cookies ever baked were the date pinwheels my Grandma Helen used to let me sneak before dinner, obtained early only because I would ask so politely.  As a sweet treat come full circle, I made them for her in her later years, a novice baker giving her recipe a whirl.

In the years since Great Helen’s passing, I’ve made sure these are always on the cookie plate at our church tree trim and our family gatherings. For us, it’s just not Christmas without them. We keep the traditions revolving around these pinwheels alive.

Since “Great Helen” (as my children used to call their great-grandma) wrote her recipe in the proficient shorthand of a busy cook, I’ve fleshed out the details, making use of a few techniques which make the recipe easier to master.

Great Helen’s Date Pinwheels

1 pound dates, coarsely chopped

1 cup water

1½ cups granulated sugar, divided

4 cups all-purpose flour, plus extra for dusting

1 teaspoon baking soda

½ teaspoon salt

1 cup brown sugar

1 cup butter, (2 sticks), softened

3 eggs

1 teaspoon vanilla extract

Combine the dates, water and ½ cup granulated sugar in a medium saucepan.  Cook over low heat, stirring frequently, until the dates are very tender and the mixture is a thick paste, about 10 minutes.  Let cool while you make the dough.

In a large bowl, whisk together the flour, baking soda and salt and set aside.  In another bowl cream the butter, brown sugar and the remaining cup of granulated sugar until fluffy, either by hand or with an electric mixer set to medium speed, about 3 minutes.  Add the eggs one at a time, beating well between additions.  Add the vanilla extract.  With the mixer on low, gradually add in the flour mixture, stirring just until combined.

Divide the dough into 4 equal parts and, working with one section at a time, roll the dough out on a sheet of wax paper forming a 12-by-8-inch rectangle.  Spread a quarter of the date mixture on the dough.  (If the dates seem too thick to spread, add water, a tablespoon at a time, stirring well to reach desired consistency.)  Working with the long side of the rectangle, lift the wax paper, tucking in the edge and rolling the dough over on itself to form a tight cylinder.  Wrap the roll in the wax paper and place in the freezer.  Repeat with the remaining dough and dates.

When the dough is firm, preheat the oven to 350 degrees and line baking sheets with parchment paper.  Unwrap one log of dough and cut in ¼-inch thick slices, spacing the cookies on the prepared sheets, reshaping if necessary.  Bake until the tops are just golden brown, about 10 minutes.  Allow to cool completely before storing in an airtight container up to 1 week.

A+ Apples

Apple Cupcakes

An apple for the teacher can take many forms these days–from a shiny red fruit to a sleek iPad upgrade. Always a bit of an apple-polisher myself, I’ve made a habit of providing an apply treat in honor of September’s celebrated fruit and the fruitful beginning of a new academic year. In my house, the first day of school apples come in cupcake form.

This version of our seasonal treat is based on a cake recipe I learned from my mom, who learned it from hers, who taught in a one-room country schoolhouse. For a little extra credit, you can fashion these cupcakes to look like apples, too. Mound the frosting up, with a divot on top. Choose bright red sanding sugar with a tootsie roll stem, or Granny Smith green with a pretzel stick and a real mint leaf. Any way you choose to decorate them, these apple cupcakes are teacher-approved and sure to make the grade–or at least sure to make the transition to a new grade level a little sweeter.

Apple Cupcakes

Cake

2 ½ cups flour

1 teaspoon each baking soda, salt and cinnamon

½ cup unsalted butter, softened

1 cup granulated sugar

1 cup brown sugar

2 large eggs

1 cup milk

2 ½ cups peeled, cored and finely diced apple

Optional Decoration

Cream cheese frosting

Red or green sanding sugar

Tootsie rolls, green apple frooties, or pretzel sticks and fresh mint leaves

Preheat the oven to 350 degrees and line muffins pans with red or green liners, enough for about 2 dozen cupcakes. Whisk together the flour, baking soda, salt and cinnamon and set aside. In a mixing bowl, cream together the butter and sugars until light and fluffy. Add the eggs one at a time until well combined. Add the flour mixture alternately with the milk until the batter is smooth. Fold in the apples. Portion the batter into the prepared pans and bake until set and a toothpick comes out clean, about 20 minutes. Remove to a wire rack to cool.

Generously frost with fairly stiff white frosting, mounding the frosting up and creating a small indentation in the center. Roll the cupcake gently in sanding sugar to entirely coat the frosting. Create a stem for the apple by inserting a pretzel stick or a piece of tootsie roll quartered lengthwise. Use a fresh mint leaf for garnish or flatten a green apple frootie and cut it out to form a leaf. For fun, use the tines of a fork to carve out a “bite” from one or more of the apple

cupcakes. Fill and smooth the indent with frosting and place two or three tiny tootsie roll “seeds” toward the bottom.

Corn Cob; Piping Hot

corn

If you’re looking for a new way to spice up an old favorite, take your sweet corn out of the pan and into the fire with this spicy corn recipe. Grilled right in the husks, this is a rustic and simple side dish perfect to add to any outdoor menu. Once you learn the technique, it’s an easy way to enjoy summer’s best kernels outdoors. I’ve created a chipotle butter to add spice as a counterpoint to the corn’s natural sweetness, which also echoes the smokiness of the cooking method. And when they come off the grill, piping hot, pre-seasoned and ready to eat, the hardest thing is to wait until your ears of corn are cool enough to handle. But if your ears are burning, it probably means someone’s just talking about how good the corn is going to be.

Grilled Sweet Corn with Chipotle Butter

6-8 ears of corn

½ cup butter, melted and cooled

1 canned chipotle chili in adobo sauce, seeds removed and finely minced

1 clove garlic, minced

1 tablespoon fresh oregano, finely chopped or 1 teaspoon dried

1 teaspoon cumin

½ teaspoon salt

Remove any loose leaves from the corn husks and place the ears in a large bowl. Cover the corn, making sure to completely submerge it and allow it to soak at least one hour or overnight. Discard the water and shake off any excess water from the corn.

Meanwhile, combine the butter, chili with adobo, garlic, oregano, cumin and salt in a small bowl and mix thoroughly.

Peel back the husks of the corn about ¾ of the way to the stem, being careful not to pull them off. Remove the silk, then brush the corn liberally with the butter mixture. Smooth the husks back up over the buttered corn. Gather them up at the tip, tying a piece of corn husk around them to keep them in place.

Grill the corn over medium heat for about 30 minutes, turning every 5-10 minutes. The corn is done when the husks are slightly charred and start to pull away from the top and the kernels appear golden and buttery. Serve hot, brushing the corn with any remaining seasoned butter, to taste.

Summer Aria

peach melba

Ah, summer! The season that sings with fresh flavors is now full upon us, offering up seasonal delights aplenty. At the height of the season, one fruit—the peach—rises to juicy perfection. A real diva of summer, a peach is a lyrical tribute to the warm sun that ripens it. No wonder the famed French chef Escoffier looked to the peach when creating a dessert tribute to the operatic soprano, Nellie Melba. The classic dessert that bears her name, Peach Melba, hits all the high notes of summer: fresh peaches, ripe raspberries and rich vanilla ice cream.

The dessert is simplicity itself, reliant on subtle enhancement of the best possible fruit. In fact, the original involved nothing more than blanched and sugared peaches as the main component. Here, I’ve given the peaches the real royal treatment by lightly poaching them with fragrant vanilla. Be sure to keep your ice cream in tune by choosing the best quality real vanilla flavor you can find or make. Served in stemware, you’ll find these three components—ice cream, peach and raspberry sauce—elevated to new heights. Singing this dessert aria of summer, you’ll soon see why Peach Melba will forever be a star.

Peach Melba

2 cups sugar

2 cups water

2 tablespoons fresh lemon juice, divided

½ a vanilla bean, split lengthwise and seeds scraped

4 fresh peaches

2 cups raspberries

¼ cup powdered sugar, or to taste

vanilla ice cream, for serving

toasted slivered almonds (optional), for garnish

Combine the sugar, water, 1 tablespoon lemon juice, the vanilla pod and seeds in a wide saucepan over moderate heat. Stir to dissolve the sugar and bring the mixture to a boil.

Halve the peaches and remove the pits. Place the peach halves into the boiling syrup, in two batches if necessary, and simmer until the peaches are soft throughout, about 5 minutes depending on ripeness. Remove the poached peaches to a bowl with a slotted spoon and, when cool enough, slip off the skins. If preparing them in advance, store them in the refrigerator in their poaching liquid.

Meanwhile, puree the raspberries with the powdered sugar and the remaining tablespoon of lemon juice. Pass the mixture through a fine-mesh sieve or food mill to remove the seeds.

When ready to serve, scoop vanilla ice cream into each serving dish, place poached peaches amid the ice cream and top with the raspberry sauce. Garnish with almonds, if desired.

Gone Fishing

 Baja Fish Taco
It’s summertime, and the fish are jumping—right into all kinds of cuisines. While those of us north of the border don’t often think of Mexican food when we imagine fish dishes—likely because of all the heavier meat and cheese-laden Tex-Mex fare that dominates—our southern neighbor boasts long coastlines and all manner of seafood.

One of the tastiest treatments of white fish comes from the Baja peninsula, south of California, in the form of a casual taco. A tasty balance of crispy batter-fried and tender white fish with a rich sour cream sauce, and topped with crunchy cabbage, a Baja fish taco is like a fish dinner wrapped up in a soft tortilla. Sure to please even the least likely fish eaters, it’s a fun way to get everyone involved in the meal, since assembly is plate-side and each person can customize their tacos to taste.

If you happen to have some fishermen and women who want to contribute their catch of the day to the meal, so much the better! When the fishing is good, the leftovers will freeze well and be at-the-ready for a quick broil some other day. If you end up with just a small fry, these tacos are a great way to impressively make a little fish go a long way. So when fish is on the menu, try this line from the Mexican coast and you’ll be hooked. Once you taste these tacos, you’ll likely find that, of all the possible preparations of fresh fish, the one you’ll be longing for is the one that goes olé!

Baja-Style Fish Tacos

2 cloves garlic, minced

1 ½ teaspoons salt, divided

1 tablespoon yellow mustard

1 cup light beer, sparkling water or plain cold water

1 teaspoon baking powder

1 cup flour

1 pound boneless, skinless white fish fillets (cod, halibut or tilapia)

oil for frying, to a depth of 1 ½ inches

½ cup sour cream

½ cup mayonnaise

juice of ½ a lime

½ teaspoon crushed oregano

1 teaspoon ground cumin

1 tablespoon fresh dill, chopped

cayenne pepper, to taste

12 small corn or flour tortillas, warmed

1-2 cups finely shredded cabbage

fresh salsa, hot sauce and lime wedges, for serving

Finely mince the garlic, sprinkle generously with salt and mash it back and forth with the side of your knife a few times, crushing it into a puree. Scrape the garlic salt into a medium bowl, add another ½ teaspoon salt, the mustard and the beer or water. Mix well. In a separate bowl, combine the baking powder and flour. Add the flour to the wet ingredients and whisk just until combined.

Line a platter with paper towels and heat the oil to 375 degrees. Cut the fish into ½-inch strips, about 3 inches long. Use a pair of tongs to dip the fish strips into the batter and fry in batches, being careful not to crowd the pan. Fry until golden and crisp, about 4 minutes, then transfer to the prepared platter and keep warm in a low oven; continue to fry the rest of the fish.

In a small bowl, mix together the sour cream, mayonnaise, lime juice, oregano, cumin, dill, cayenne and ½ teaspoon salt until well combined.

To serve, place a piece or two of fish in a tortilla, top with cabbage, sour cream sauce, salsa, hot sauce and a squeeze of lime to taste.

Busy Bees

honeybees

Now that we’re into the full buzz and hum of summer, it’s only natural for kids to have some time when they’re looking for a little direction. When next you hear cries about being hungry and bored, here’s a great little kitchen project that can take care of both conditions: peanut butter honey bees. These no-bake treats are simple and healthy, with lots of hands-on decorating that even the youngest chefs can do. Older kitchen helpers may enjoy learning a little about how the bees buzzing through the backyard make the honey that sweetens these treats. And everyone can benefit from eating these candy bees—especially allergy sufferers, as research suggests that eating a little locally produced honey each day can lesson one’s sensitivity to seasonal allergens.

So while those backyard bees are busy fulfilling their vital role as pollinators, you can keep little hands busy making bees to help take the sting out of summer boredom. Soon, you’ll all be buzzing about this honey of a snack.

Peanut Butter Honey Bees

1 cup natural peanut butter

1 cup honey

3 cups old fashioned rolled oats

1-2 tablespoons butter, softened

½-1 cup chocolate chips, to taste

¼ cup sliced almonds

Heat the honey and peanut butter together in a medium saucepan over moderate heat just up to boiling, stirring to combine. Off the heat, add in the oats and mix well. Allow the mixture to cool.

Meanwhile, line a large baking tray with parchment paper. When the mixture is cool, lightly butter your hands and, working with one tablespoon at a time, form the oat mixture into small logs and place them in rows on the baking tray.* You should end up with about 40 honeybee candies.

Melt the chocolate and pipe or drizzle stripes over the bees. Use four sliced almonds per bee to create the wings, using the chocolate stripes to help them adhere. Refrigerate until firm.

*Alternatively, form the mixture into bars by pressing into a greased square pan and spread the melted chocolate on top.

Got Mango?

We know milk and fresh fruits are healthy parts of a balanced diet, so imagine a way to get lots of each in a tasty summertime refresher! A cool treat on the Indian subcontinent, a kulfi is a frozen dessert of reduced milk, sweetened and flavored to taste. Saffron, pistachio, mango and rosewater are some of the more enduring flavors sold by kulfi vendors. Often compared with ice cream, kulfi is a bit different in that it should be dense and slow-melting, due to the long, slow simmering process of reducing the milk. Many quick versions rely solely on canned evaporated or condensed milk, which certainly works in a pinch, but alters the flavor. Here, I’ve combined the best of both, and paired some of those classic flavors into a very fun yet sophisticated popsicle. You can also freeze kulfi into ramekins or little pots and unmold them onto a plate for serving, if you’d rather. Of course, you’re less likely to end up with a kulfi mustache that way. But the smiles of those that try them will still be a sure sign that when you’ve got milk, and you’ve got mango, kulfi does a body good.

Mango Kulfi

2 cups whole or 2% milk

1 can (14 ounces) sweetened condensed milk

¼ cup sugar

¼ teaspoon ground cardamom

1 tablespoon cornstarch or rice flour

1 tablespoon cold water

a few threads of saffron (optional)

2 cups fresh mango pulp from 3-4 mangos

finely chopped shelled pistachios, optional

Pour the milk into a medium saucepan and bring to the boil. Lower the heat and simmer, stirring frequently, as the milk starts to reduce, 15-20 minutes. Add in the sweetened condensed milk and stir well to incorporate.

Meanwhile, in a small bowl, combine the sugar and cardamom. Add the spiced sugar into the reduced milk mixture. Then, in the same small bowl, combine the cornstarch or flour with the water and mix to a paste. Stir this into the milk mixture and return to a simmer, stirring constantly until thickened. The mixture should coat the back of a spoon.

Off the heat, place a few threads of saffron on top of the milk and allow it to bloom. Stir the mixture as it cools to prevent a skin from forming. (To cool the mixture more quickly, plunge the saucepan into a bowl or sink full of ice water.)

Meanwhile, peel the mangoes and slice the flesh off the pits into the bowl of a food processor or blender. Use your hands to squeeze any remaining pulp from the pits. Puree into a smooth paste. Combine the cooled milk mixture with the mango puree and pour into ramekins, popsicle molds, or a large shallow dish, depending on how you plan to serve the kulfi. Place in the freezer until fully set, about 6-8 hours. Unmold and serve, garnished with chopped pistachios, if desired.

Berry Delicious

berry pie

Few culinary creations can rival the simple pleasure of a ripe, sun-warmed berry. Plucked from its plant and popped into one’s mouth in an instant, the berry becomes the emblem of the season—bright, luscious, and fleeting. Their often playful balance of sweet and tart flavors make them the perfect foil to a summery salad and the succulent stars of many homey desserts.

Preferring freshly foraged fruit, I like to keep my summer berries as close to their natural state as possible. But when you want a little something more than just a bowl-full, a chilled berry pie is a true delight. Here, the fruit is served fresh in a pastry crust atop sweetened cream, which has been enriched with tangy cream cheese. Held in place by a quickly cooked sauce of the berries’ own thickened juices, this dessert is a balance of light and rich tastes, and feels fancy without being fussy. Most of all, it highlights summer—at its berry best.

 Fresh Berries and Cream Pie 

 1 pre-baked 8 or 9-inch pie shell, preferably homemade 

4 ounces cream cheese, chilled

3/4 cup sugar, divided

1/2 cup heavy cream

1 pint fresh berries, or enough to fill the pie shell

3/4 cup mashed or pureed and sieved berries

1 1/2 tablespoons corn starch

1 tablespoon lemon juice

2 tablespoons butter

 With the whisk attachment of a standing mixer, whip the cream cheese and 1/4 cup sugar until smooth. Gradually pour in the cream in a steady stream and continue to whip until light and fluffy. Spread 2/3 of the cream mixture evenly into the pie crust. Top with the berries, arranging neatly, stemmed side down if using whole strawberries.  

In a small saucepan, combine the remaining 1/2 cup sugar with the cornstarch. Stir in the berry puree, lemon juice and butter and bring to a gentle boil over moderate heat. Simmer, stirring constantly, until the mixture thickens. Carefully pour the mixture over the berries, evenly filling the pie. Refrigerate until set, at least an hour or overnight. Serve cold and use the remaining cream to garnish individual slices.

Feast of Fire Works

grilled chicken

When it comes to marking our nation’s Independence Day, the more flash and sizzle the better—from the flame of the grill, to the flare of fireworks, we love these sure-fire ways to get us all fired up in the heat of July. If you want to heat your grill up even more, throw on a batch of my firecracker chicken. A cool overnight soak in buttermilk helps prepare your poultry for the incendiary sauce that explodes with flavor and adds a little excitement to your usual grilled fare.

Sriracha, a southeast Asian chili sauce, is what gives these wings and legs their kick. In the best of our melting-pot American culture, we’ve embraced this bold condiment, and found it a home in American cuisine. As sign of its assimilation, I’ve even seen it as a new flavor of potato chip. If it seems a little too fiery, never fear: it’s tempered on the grill and this fiery red glaze will meld nicely with a creamy blue cheese dip. So fire up your grill and get ready for the ‘oohs’ and ‘ahhhs’ of your firecracker chicken becoming a finger-licking part of your July 4th feast.

Grilled Firecracker Chicken

Marinade

2 cups buttermilk

1 tablespoon brown sugar

2 teaspoons salt

1 teaspoon smoked paprika

1 teaspoon cumin

¼ teaspoon cayenne pepper

1 white onion, sliced

2 pounds chicken drumsticks and wings

Glaze

2-4 tablespoons Sriracha sauce, to taste

1/3 cup brown sugar

1 teaspoon salt

2 cloves garlic, minced

¼ cup tomato paste

½ cup mirin (rice wine)

3 tablespoons soy sauce

¼ cup fresh lime juice

¼ cup chopped fresh cilantro

To make the marinade, whisk together the buttermilk, brown sugar, salt, paprika, cumin and cayenne pepper until well combined. Add the onion and chicken, turning to coat all pieces. Cover and refrigerate for 6 to 12 hours.

Prepare coals or preheat a grill to medium. Meanwhile, combine the Sriracha, brown sugar, salt, garlic, tomato paste, mirin and soy sauce in a small saucepan. Whisk to combine and bring to a simmer over low heat. Allow to thicken, about 8 minutes, then off the heat stir in the lime juice.

Remove the chicken from the buttermilk and discard the marinade. Lightly oil the grill, then place the chicken over medium-hot coals and brush with glaze. Cook for two minutes, then flip and brush with glaze. Continue to flip and glaze every 2-4 minutes until the chicken is cooked through, about 20-25 minutes, depending on the size of the chicken pieces. Transfer the cooked chicken to a clean platter and sprinkle with chopped cilantro before serving.firecracker

Coffee Concentration

coffee

Whether you’re a slave to coffee or you just enjoy the occasional java jolt, there’s something fun about putting this brew on ice. It’s a cool way for this workaday cup o’ Joe to lighten up for the summer months. Trouble is, when you want a glass right away, your usual brew often isn’t up to strength. Instead of settling for a watered-down version, try improving your coffee’s concentration. This is a recipe for a big batch of coffee concentrate that you can enjoy within minutes, and will be at-the-ready all week. If you’re a real coffee connoisseur and prefer the trendy cold brew method, you can use the same coffee-to-water ratio, (16 cups cold water; omit the boiling water) and let the grounds steep overnight.

Once you’ve strained your coffee concentration, you’ll want to relax and mix a cup to taste. For a quick and easy way to add creamy texture and sweetness, I like to take a cue from the traditional Vietnamese dessert coffee and stir in some sweetened condensed milk. To be even fancier, you can put the condensed milk and coffee—ice and all—in a blender and make your own Frappuccino. Serve some up at your next soiree and everyone will be buzzing about your great caffe concoctions.

Iced Coffee Concentrate

1/2 pound medium-ground coffee (about 3 1/4 cups)
8 cups boiling water
8 cups ice water
1 can sweetened condensed milk

Pour ground coffee in a large heat proof bowl or pot. Add in 8 cups boiling water, making sure to get all of the coffee grounds wet. Let the coffee bloom for about five minutes or longer, depending on your preference.

If you have a French press, or “press-pot” coffee maker, put the coffee and grounds through the press in a couple of batches, pouring the filtered coffee into a large pitcher or carafe. Otherwise, line a fine mesh strainer with six layers of cheesecloth and place it over a large heat-proof bowl. Carefully pour the coffee and grounds through the strainer into the clean bowl; transfer to a pitcher or carafe. Discard the coffee grounds and add eight cups ice water to the coffee. Refrigerate until ready to use.

To serve, fill a glass or mason jar almost to the top with ice. Pour coffee concentrate to the top of the ice. For a 12-ounce serving, add about two tablespoons sweetened condensed milk, to taste and stir to incorporate. The coffee concentrate will keep, refrigerated, up to three weeks.